Adobe Premiere AAF export settings
AAF export for audio post is a common practice, so video editors are very used to it. However, it is also possible to get a more feature rich sound project translation via XML export instead. This process is slightly more complicated because XML references original media (with original metadata that the sound editor may want). Therefore this involves an extra step to package up the media to send to the sound editor with the XML.
The free version of Vordio can be used to automate this step for the video editor to make it much easier. The sound editor may prefer to work with kind of project due to the more feature rich translation which includes multichannel clips, original location audio files & more metadata, so it may be worth trying a new workflow that you are not used to. For more detail on this “remote workflow“, here are step by step instructions for the video editor and sound editor.
Instructions for the video editor
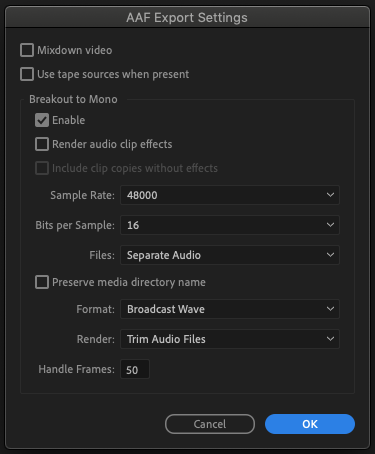
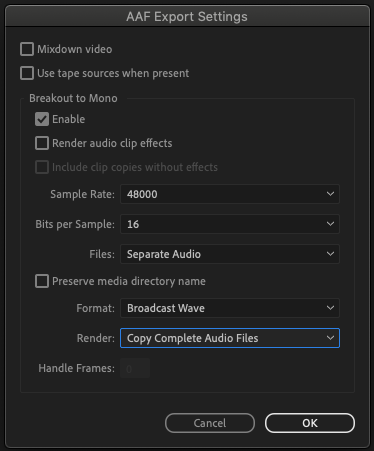
AMWA (the standards association that maintain the AAF standard) no longer recommend the use of embedded audio, especially for large projects. Using separate external audio files is highly recommended. This produces a smaller AAF with a folder of audio files. This can avoid many of the problems with large AAFs that can prevent conversion later.
Option A.
If the sound editor requires full files then use these export settings below. Full files can be useful if the sound editor needs to search for room tone within files. However this will result in larger files. If room tone is not required or you provide room tone separately then option B may be preferred.
Option B may also be absolutely necessary for long projects to reduce size and transfer time.
Option B.
The settings below provide smaller files with “handles.” The handles provide a little extra audio at each end of the file which is useful when editing. A minimum of 50 frames is recommended but the sound editor may want longer handles depending on the type of project.